Notes on a Morbic Build in New Zealand.

classic Classic list List threaded Threaded
35 messages Options
12
Reply | Threaded
Open this post in threaded view
|

Notes on a Morbic Build in New Zealand.

Nigel McC
I began building the Morbic in mid-July. I decided to complete the spars, centreboard, rudder and stock, before starting work on the hull. In my previous builds, mostly Oughtred designs, I have completed the hull, then discovered I have another month or so of work before I can go sailing.
So I made bird’s mouth spars from imported Douglas Fir. The timber was disappointing, developing splits and gaps within the glue up. Use the Duckworks calculator to caculate the dimensions of the spar strips.
It took about 30 hours to complete the boom, yard and mast.  Out of interest, I glued the boom and yard using polyurethene glue, and the mast with epoxy. I wouldn’t use polyurethene again … messy, not much quicker than epoxy, and goes off quickly
I assembled the mast in two halves, so that I could add plugs and shape the slot for the halyard sheave. The plugs seal the middle of the mast, adding floatation.
In mid September, a friend who has a second-hand CNC cutter, cut the planks and girder from Vivier’s files.
These are excellent. The girder and planks fit together in most cases within + 2 mm and the time saving is huge. Strongly recommended.
The rudder and centreboard case took about 20 hours.
I use Titebond III to glue flat surfaces, such as doublers for centreboard and transom. It’s quick and easy to clean up. There is an old study from the US Forest Service that reports Polyamide glues are equally water resistant to epoxy. However, amide glues have poor gap filling properties so can only be used for well matched surfaces.
I laminated the false stem from Ash, two to three 3 mm layers at a time, and glued with Titebond III much easier than with epoxy.
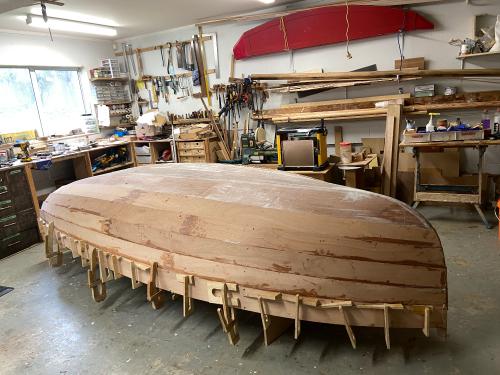
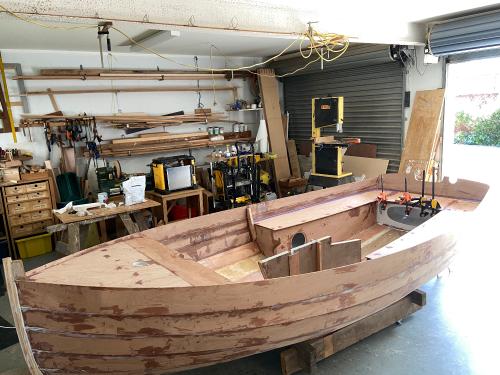
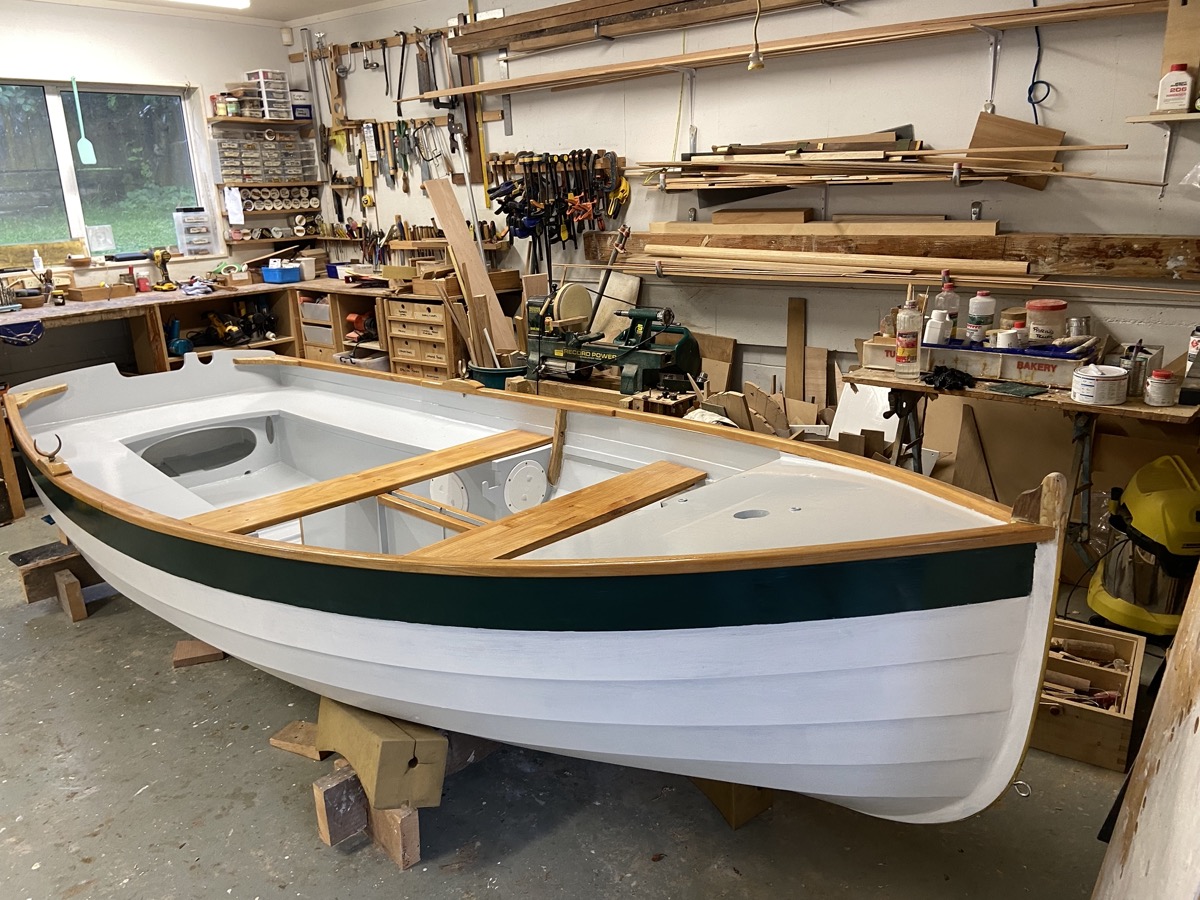
I assembled the girder and molds at the beginning of October. Again, the Vivier CNC files are fantastic. The transom, longitudinal bulkheads went together in half an hour. I finished planking by 25 October. The only difficulty was, as usual, bending the the garboards into place, and cutting the gains to the stem. I’ve glued the planks with West System 105 + slow hardener.
Time spent to date, about 120 hours, including a round trip to Auckland to collect timber.

Notes:
1. Don’t use Polyurethene glue. Use Titebond III for well jointed surfaces, and epoxy when gap filling or filleting.
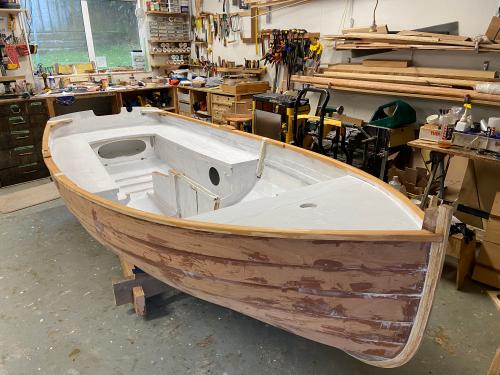
2. I lined the inside of the rudder stock with fibreglass to resist abrasion; that decreased the gap between the cheeks and the rudder cap no longer fitted. I’ve had to cut the cap in two and add a further layer of 2 mm ply to accommodate the rudder.
3.  I cut additional clamping holes in the centre stem-leaf because I don’t have enough long clamps to laminate the false stem
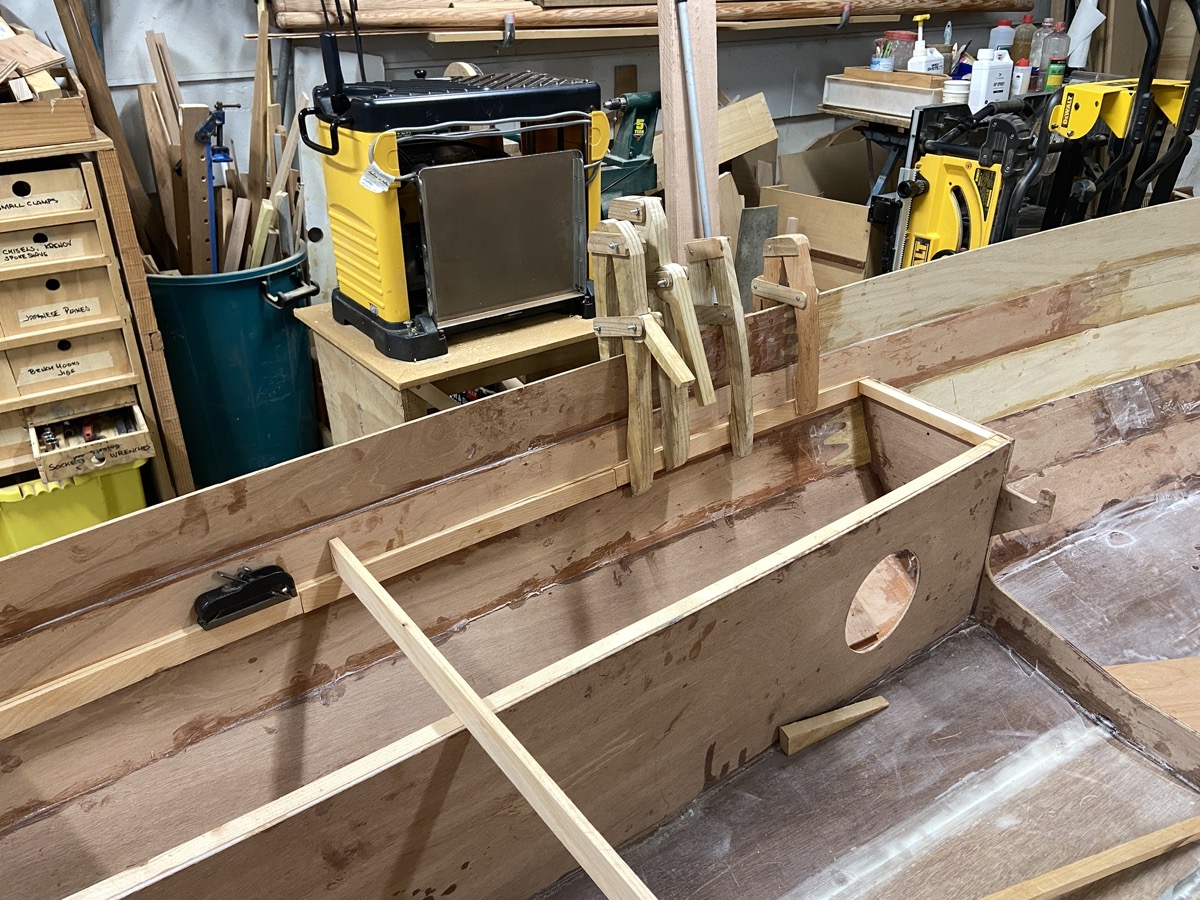
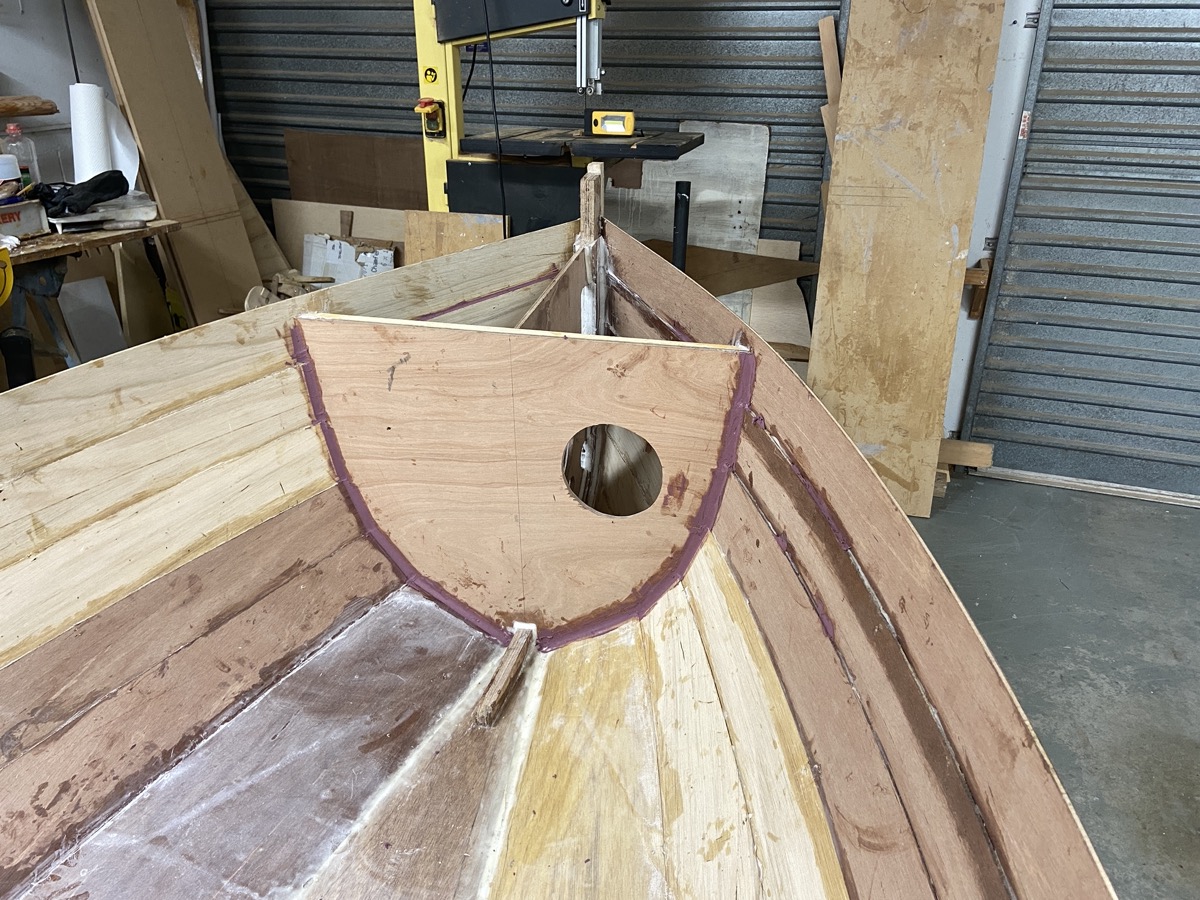
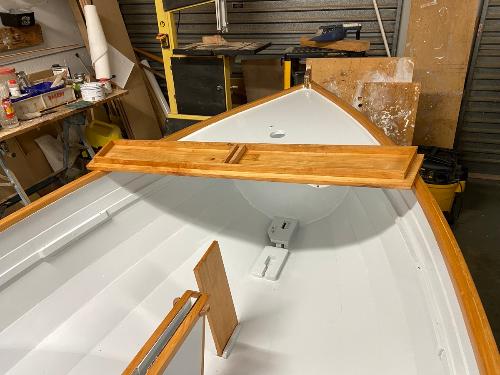
4.  Cut the holes for inspection ports in the longitudinal bulkheads in advance … it will be difficult when the bulkheads are glued in place. I made a circular cutting compass to mark the circle, and prevent chipping prior to cutting out the ply with a jig saw.
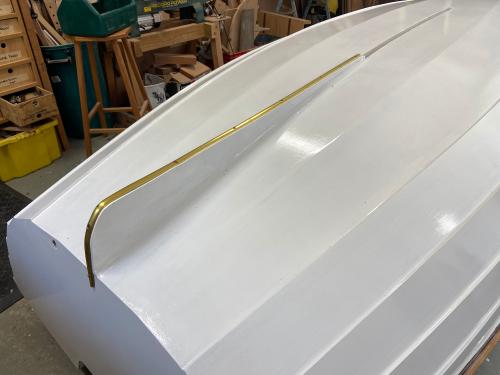
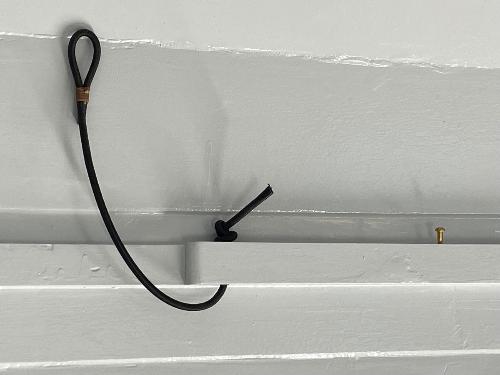
5.  I’ve drilled through the stem and false stem to allow me to fit an eye, for towing, trailer security or a bowsprit.
Blunders:
1.  I glued both halves of the centreboard case together, had to start again
2.  I made an incorrect mix of resin for the final coat whilst fibreglassing sole and garboard; patches didn’t cure. I scraped the off the uncured resin by wire brushing in acetone and cabinet scraper. Fortunately, the underlying coats cured.
3.  I ordered Meranti ply during Covid lockdown from a local supplier. When I collected the sheets, I inspected the top two, but didn’t look close enough. The sheets were inconsistent, of poor quality. Moreover, and three-ply. Whilst I don’t think it will make a huge difference in the long term, three-ply is not nearly as strong as five, the face veneers are inconsistent, and there will be significant extra work in finishing and reinforcing the planks. I should have waited and paid the extra for five ply.
4.  I’ve never been able to cut accurate gains in thin 6 mm planks. I shall reinforce inside the bow compartment with 100 gm tape.

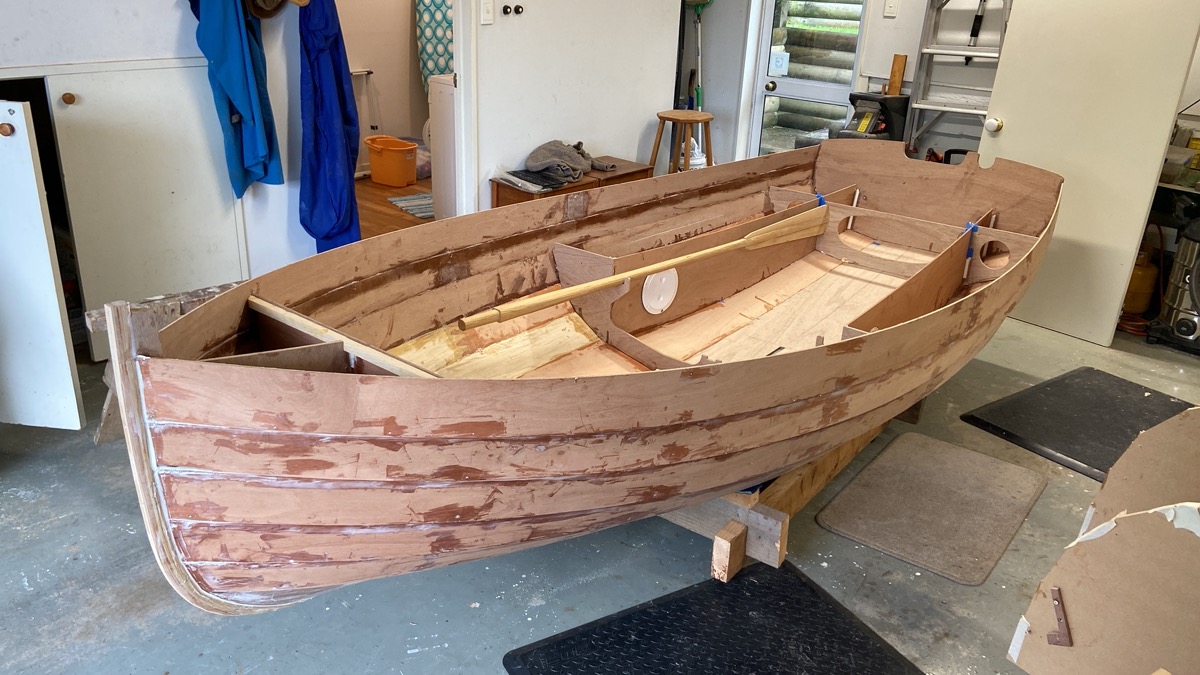
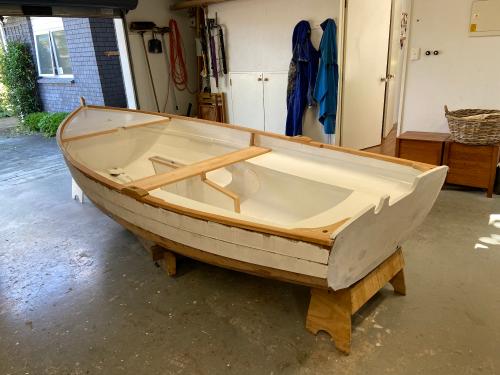
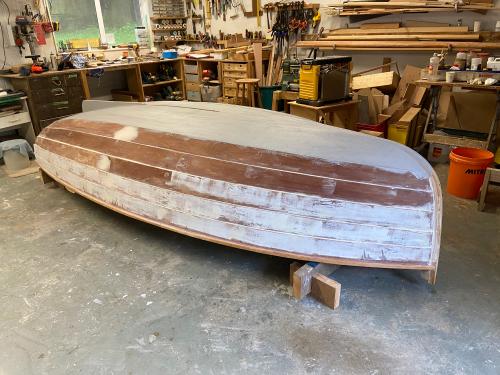
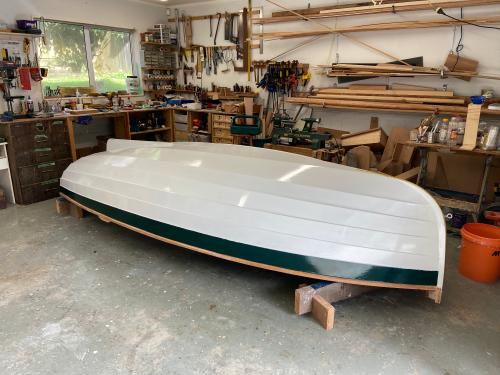
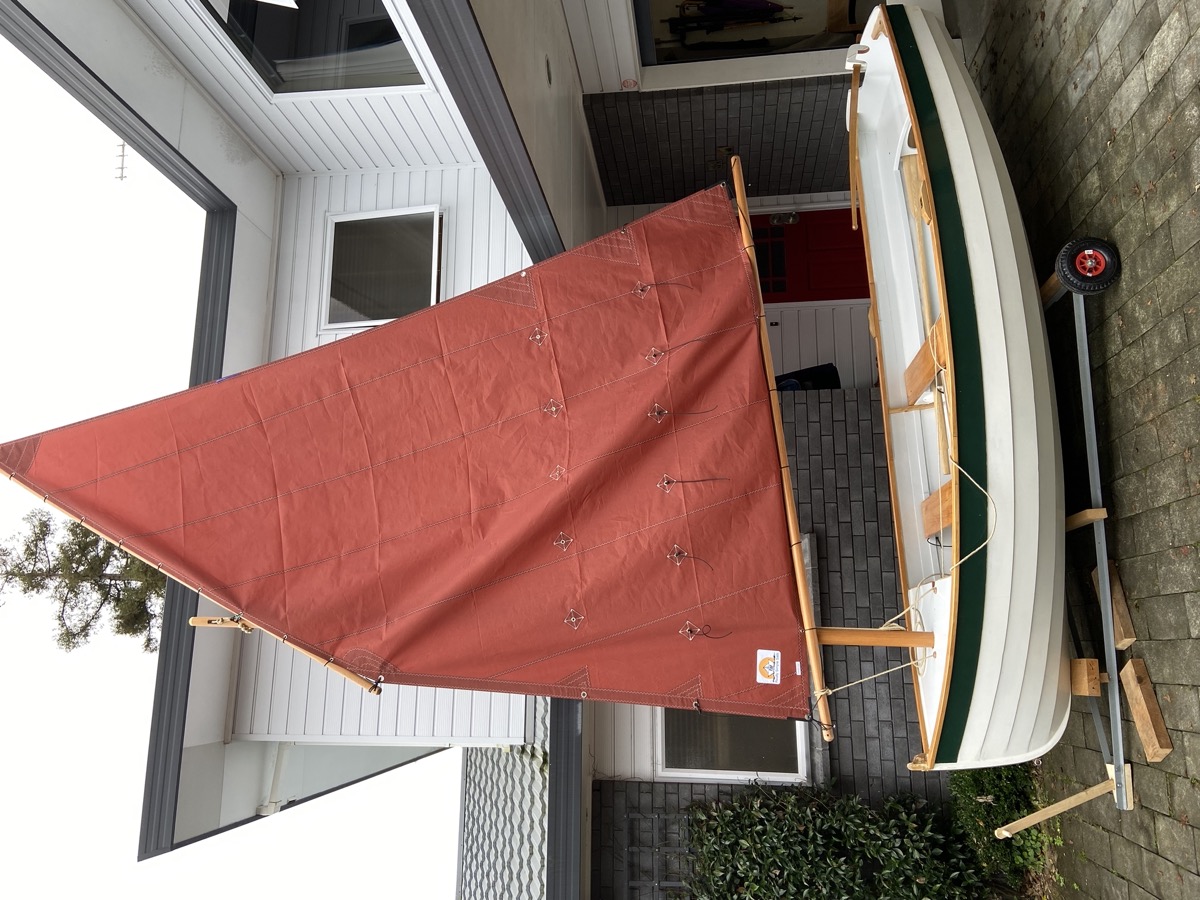
So here we are, hull complete, waiting ready for turn over:)
Reply | Threaded
Open this post in threaded view
|

Re: Notes on a Morbic Build in New Zealand.

Nigel McC
This post was updated on .
And progress continues, albeit slow. The hull was turned last weekend, and I began filleting the interior joints for the buoyancy compartments using West 105 and colloidal silica for the fillets. I wear a good mask for mixing, the powder scares me.  

I'm going to have to decrease the width of the oar loom, to fit the design slot.:)
I've also added the seat battens. I found that at the specified size of 20 mm x 30 mm battens, the macrocarpa timber I am using is too stiff to bend to the curve, and was distorting the shape of the hull, as well as failing to form a tight match to the hull planks. So I have cut 10 mm x 30 mm strips, and laminated these into place, clamping them in place with home made long reach clamps.

I also noted that the batten top surfaces were not aligned with the seat plane, because the main face is clamped to the plank, which is at an angle to the seat. So I set the battens proud then planed down to match the angle, using a tell tale batten and an antique shoulder plane I found in an antique shop several years ago in Sydney (its the little black thing in the  photograph). Now the seat support battens are ready to receive the ply seats.  

Reply | Threaded
Open this post in threaded view
|

Re: Notes on a Morbic Build in New Zealand.

PaulW
Administrator
Hi Nigel
Impressive clamps!
It's good to see your Morbic coming together - You must be pleased.

Re. Oars.  Are yours the specified length?  When we stow ours, the blades touch the transom and the handles touch the inside of the hull.  I think ours are about 2m 85cm.  (112"?).
Short oars may be easier to stow but not good for sustained rowing.

Vivier's "Plan 41" says; "There is 2 different lengths, 2.6 for fore thwart and 2.7 m for main thwart.
That is why some dimensions are doubled, for example 510 / 530.
The shorter oars are easier to stow on board and may be choosen as
the unique length if you intend to make only a limited use of oar."


Re. Hatches for accessing watertight compartments/lockers. - Two thoughts, FWIW.
If it's not too late, cut the forward one off-centre - Much better for access when the mast is in position.
Consider adding a small hatch in the forward face of Frame 3.  This enables stowage of things like the tiller.
Reply | Threaded
Open this post in threaded view
|

Re: Notes on a Morbic Build in New Zealand.

Nigel McC
Yes, I did put the forward hatch off centre ...


and I thought about the extra hatch on frame 3, but then started to worry about the strength ... what think you?

Oars I made for another dinghy, so I might make some to Vivier's specifications. A friend and I managed to source a supply of 30 year old macrocarpa and cedar, so I should have enough to laminate up new oars.

The clamps were made from scrap timber from a design in Small Boats Monthly ... they have proved really useful.
https://smallboatsmonthly.com/article/long-reach-clamps/
also
https://www.youtube.com/watch?v=Dpt6o6wjOAU

I keep meaning to make more, because they are incredibly useful, but don't seem to get round to it.
Reply | Threaded
Open this post in threaded view
|

Re: Notes on a Morbic Build in New Zealand.

PaulW
Administrator
This post was updated on .
Forward Hatch - Good to see yours off-centre.
It's a mystery why Vivier specifies central. Easier access to both sides?  We find we rarely need that, and you don't want the mast in the way!

Frame 3 Hatch
 - You've seen the pic of ours.  It is a smaller diameter than the other three.  IMHO a neatly cut and smoothly finished circular hole of modest diameter, with properly fitted decent quality hatch, should not adversely affect strength at that location.  (N.B. I'm a retired engineer, not a naval architect.)

Swamp test
 - I stood in the boat while we deliberately swamped "Proteus", for about 20 minutes, to above the tops of all hatches.  This is somewhat deeper than one sees after capsize recovery.  Water ingress from the deliberate swamping was zero on starboard, a few tea-cup-fulls on port, and an egg-cup-full forward.  We attributed the weepage to sub-optimal tightening of hatches.  Despite a subsequent accidental swamping and one capsize the spaces have remained dry.  Gently up to closed, plus a little more seems adequate.  Too tight might tend to degrade the o-ring seal.

Hatch type - The one in your earlier pic looks similar to ours.  I'm now pleased we fitted them.  Reports indicate the lever-closure type are easier to operate but are less watertight.

Oars - Understood.  We're pleased with the length of ours.  BTW - Rather than the thole pin system we use rowlocks with retaining cords.
Reply | Threaded
Open this post in threaded view
|

Re: Notes on a Morbic Build in New Zealand.

Nigel McC
In reply to this post by Nigel McC
It has ben slow progress since the last post but the foredeck and seats are in, and the edges and joins between the decks, planks and longitudinal bulkheads of the buoyancy tanks filleted with West epoxy and purple filler. That should seal the tanks completely.
Problems and solutions:
1.  The foredeck is not completely parallel to the sheer line … I have no idea how or why that happened, but the sheerline –deck gap is about 25 mm at the aft end, and 18 mm at the bow. So I have tapered the gunwale to fit.
2. The CNC cut seat did not precisely fit the curve of the hull. So I adjusted the outside curve to obtain a fit. That increased the gap between the central aft deck and the side decks from about 1 mm to 6 mm. Quickly filled with a strip of 6 mm ply over the doublers and faired with fairing compound.


Reply | Threaded
Open this post in threaded view
|

Re: Notes on a Morbic Build in New Zealand.

PaulW
Administrator
Looking good Nigel.  And a spacious, well equipped workshop - Wow!

Pleased to see you've adopted the Dual Rig Option.  We find it has no disadvantages, only benefits.  
Some people create a "Lug-Plug" to discourage rain and spray from entering.  You could turn one from some spare hardwood, and include a groove for an o-ring.  (Sketch available if interested.)

You're expecting to need a Bowsprit, and a method to restrain its forward end when in use.  You may like the Mast-Stowed-Forward option (when your construction has got that far) using an enlarged Bowsprit-Iron.
Reply | Threaded
Open this post in threaded view
|

Re: Notes on a Morbic Build in New Zealand.

Nigel McC
Thanks for that ... yes, a double garage means a spacious workshop ... much more important than parking a car or storing garden tools.

I may never use the sloop rig, but I think it will be good to have the construction available.
If I do, I was thinking to use the forward lug position, as a brace for a removable samson post. The main stress on the bowsprit is lateral rather than vertical, since vertical stresses are taken by a forestay and bobstay. I don’t like the idea of using a rudder fitting on the mast, and think that a square keyed bowsprit, fitting into a Sampson post at the aft end, and braced by a bobstay forward, will be adequate … I see Cadfael has a Sampson post, which looks as if it is permanent aft of the bulkhead;  I assume the mid section of the bowsprit fits over the stem.

The enlarged bowsprit Iron is an alternative.
I'm some way from needing to figure  that out especially as it is summer here, and we are off tramping in temperate rain forest next week, so there will be no more boat building until the new year.

Best wishes to all you northern hemisphere Mobics

Reply | Threaded
Open this post in threaded view
|

Re: Notes on a Morbic Build in New Zealand.

PaulW
Administrator
This post was updated on .
Hi Nigel (& Sinfronteras) - Re. Sloop rig, construction of, benefits, disadvantages etc

Other Morbic builders & owners may add to this topic.  If not, I'll ask certain ones.

1) There are some potentially relevant comments in "Mast step and Partner".
2) Possibly more in "Which Rig".
3) For more, try using the search thingy (near the top right of the forum page).
4) You could trawl through Proteus' incomplete compilation of pics found via the website, "Known UK Morbics", "Proteus".
5) I'll aim to find un-published pics and notes from my collection.
6) (Added 14/12/22) - You may get some useful ideas from the "Swefn" video.
Reply | Threaded
Open this post in threaded view
|

Re: Notes on a Morbic Build in New Zealand.

Nigel McC
In reply to this post by Nigel McC
After four weeks of of inaction (it is after all summer in the southern hemisphere, which means less time in the workshop and more time in the great outdoors), back into the build. I’ve filleted all the joints to the buoyancy tanks, added a reveal coat of primer/undercoat (I use a thin coat of white undercoat primer as a reveal, because it is significantly easier to spot the flaws if the construction is a uniform colour) and faired obvious holes and flaws. Those were mainly from construction stage, and also a few places where the top coat of resin on fibreglass on the floor was not quite thick enough.
Now it is into sanding, filling, fairing, sanding filling fairing stages. I have left off the trim off the centreboard case and thwarts; these will be timber finish, so  all add those later when the painting is complete.
Sailing season so far has been awful. Weeks of wind and rain and now a cyclone has hit the East Coast. The Hauraki Gulf, my usual sailing ground was 35 gusting 50 knots this morning (10 January). Good workshop weather.

Reply | Threaded
Open this post in threaded view
|

Re: Notes on a Morbic Build in New Zealand.

Nigel McC
In reply to this post by Nigel McC
The inside trim is now fitted I will fit a forward thwart later, so that the boat can be balanced under sail.
I turned the hull last week, drilled location holes along the centre line, through the garboard to enable me to find fit long reinforcing screws later when the hull is turned back. Then fitted and filleted the skeg in place.
Now comes the tedious process of filling, fairing and sanding the planks. I know there are different methods of producing a reasonably smooth surface, this is mine:

On the fibreglass surfaced garboard and first plank:
1.  fill the weave with a final coat of resin and fairing filler. I add just enough fairing powder to the resin to make a thin paste. A stiff mix often produces thicker ridges that are difficult to sand smooth. A liquid paste can be spread with a rubber grouting blade. It is essential to ensure the surface is clean of dust and grit before pouring on the resin, so wipe the surface with a tack cloth just before spreading the resin.
2. Sand the surface with wet and dry 180 grit; should any reveal any low spots which can then be filled and faired.
3. A first coat of filling primer,
4. Smoothed with 180 grit, low points refilled, and then a coat of undercoat primer over all the planks.


Reply | Threaded
Open this post in threaded view
|

Re: Notes on a Morbic Build in New Zealand.

PaulW
Administrator
Hi Nigel (and others with interest in Dual rig, and whether to have a forward thwart in Sloop rig).
Your boat looks better every time we see it!

Forward thwart in Dual/Sloop rig -
 
I checked Proteus this morning.  Our forward thwart is 200 x 22 as per Vivier spec.
The distance between the aft edge of the forward thwart and the forward edge of the aft thwart is 710.  In a quick look at the drawings I didn't find the specified distance.
We find the forward rowing position is comfortable.  There is minimal inconvenience experienced with one's back/head contacting fore-deck/mast.  This is a trivial penalty for the convenience of having the second rowing position, and better fore-aft trim in some situations.
See >  here < for related notes.
Reply | Threaded
Open this post in threaded view
|

Re: Notes on a Morbic Build in New Zealand.

Nigel McC
In reply to this post by Nigel McC
Slow progress. Though not much else to do given the foul weather in NZ over the last two weeks. Auckland floods caused significant damage, it has been blowing 15-25 knots all week, and there is yet another cyclone on the way, expected to arrive on Sunday 12th February.
But that means more time sanding, fairing, and painting. The hull is now painted, and the brass keel bands fitted, but not tightened yet.

Nineteen millimetre half round brass is difficult to bend, and can kink over the pre-drilled holes. So I annealed the curved sections by heating to colour change, then plunging into cold water. The sections were then wrapped round a former of similar curvature to stem and stern curves. This worked quite well, though I can see a slight lateral curve along the keelson, I don’t think anyone else will notice.
Next stage is to varnish all the bare woodwork – with multiple coats of marine grade vanish. Then I will have a hull that I can row or motor. I’ve ordered the sails from the Phillipines, but they won’t arrive until April. We might have some decent weather by then.


Reply | Threaded
Open this post in threaded view
|

Re: Notes on a Morbic Build in New Zealand.

PaulW
Administrator
Oooo!  So shiny.  Nice to see your progress.
Re. Drilling and bending the brass (or any other strip).  IIRC the trick is to anneal it and bend it before drilling it, except perhaps for one hole on a straight bit near the end for positioning while bending.
Next time!  :-)>
Before you know it you'll be launching.
PW
Reply | Threaded
Open this post in threaded view
|

Re: Notes on a Morbic Build in New Zealand.

Nigel McC
Well, we continue to make slow progress. Partly it is summer here, though sometimes difficult to believe given the weather. I'm also waiting for gudgeons and pintles from Classic Marine; ordered in January, and still not arrived. Very frustrating.
But paint and varnish complete. Thwarts complete; the forward thwart is removable, held in place by shock cord underneath, and supported by central upright.


Fittings and cordage to add,  some touching up, plus the bowsprit and a trailer, and I can go sailing, hopefully before winter arrives].
Reply | Threaded
Open this post in threaded view
|

Re: Notes on a Morbic Build in New Zealand.

PaulW
Administrator
She's looking good Nigel.
Interested to hear you're using shock cord to restrain the removable forward thwart.  Maybe we should have done the same, though we will probably stick with the existing bronze swivel-latches.
Nice to see you've adopted the concept of a hatch at the forward end of the port "locker" - we find it very useful.  Did you do the same on starboard?
Our latest mod, still in development, is two shelves below the foredeck.  Handy for stowing bits and pieces which otherwise have no other secure place, in more-or-less dry condition.  Good for charts, sandwiches, anchor, and such.
You'll soon be sailing (assuming "Classic" have despatched the pieces).
Paul W.
Reply | Threaded
Open this post in threaded view
|

Re: Notes on a Morbic Build in New Zealand.

sinfronteras
In reply to this post by Nigel McC
Inspiring to see your progress, Nigel! Would you mind making some detail pictures of the forward thwarth arrangement with the shockcords?
Reply | Threaded
Open this post in threaded view
|

Re: Notes on a Morbic Build in New Zealand.

Nigel McC
Here are three jpgs of the forward thwart arrangement:
1. Shows the under side of the Thwart. It is laminated from 20 mm macrocarpa, which is not a particularly strong wood, hence the additional supports.The centre upright fits between two cleats glued to the floor.


2. Shows shock cord, 5 mm diameter, led through a 6 mm hole in the seat support, runs over the top and a whipped loop hooks over a brass screw. Also shows my awful finishing and filling, I hate sanding. For some reason this image in the post preview is upside down, and the next image is rotated 90 degrees. Go figure.


3. Shows the thwart in place

Reply | Threaded
Open this post in threaded view
|

Re: Notes on a Morbic Build in New Zealand.

sinfronteras
Nice idea with the shockcords! Thanks for the details.
Reply | Threaded
Open this post in threaded view
|

Re: Notes on a Morbic Build in New Zealand.

Nigel McC
In reply to this post by Nigel McC
Looks like a boat


12